Overview and Requirements
What are Location Groups?
Location Groups allow you to create customized groups of sub-accounts within the GHL Customizer. Each group can receive unique customizations like custom menu colors, custom menu items, hidden menus, custom permissions, custom buttons, and more.
Flexibility: A group can contain multiple sub-accounts or a single sub-account.
Settings Inheritance: For specific features (e.g., Menu Edits), you choose to:
Append (Adopt/Inherit): Include the Global version of a feature with the Location Group-specific feature.
Replace: Use the Location Group's custom version instead of the Global version.
Requirement: You must have the Agency Pro plan (or have been a Full Toolkit Lifetime Member) to access the GHL Customizer.
Example:
Sub-accounts #1, #2, and #3 get put into Location Group "A". This group gets their own custom menu colors, hidden menus, etc.
Sub-accounts #3, #4, and #5 get put into Location Group "B". This group gets a different menu, different colors, no hidden menus, etc. than Group "A".
You can also just put one sub-account into its own Location Group by itself.
How to create a Location Group
When you open the GHL Customizer, find the button shown in the image below and click it to create a new Location Group.

You will then see a popup that looks like this (below). This is the Location Group Settings panel.
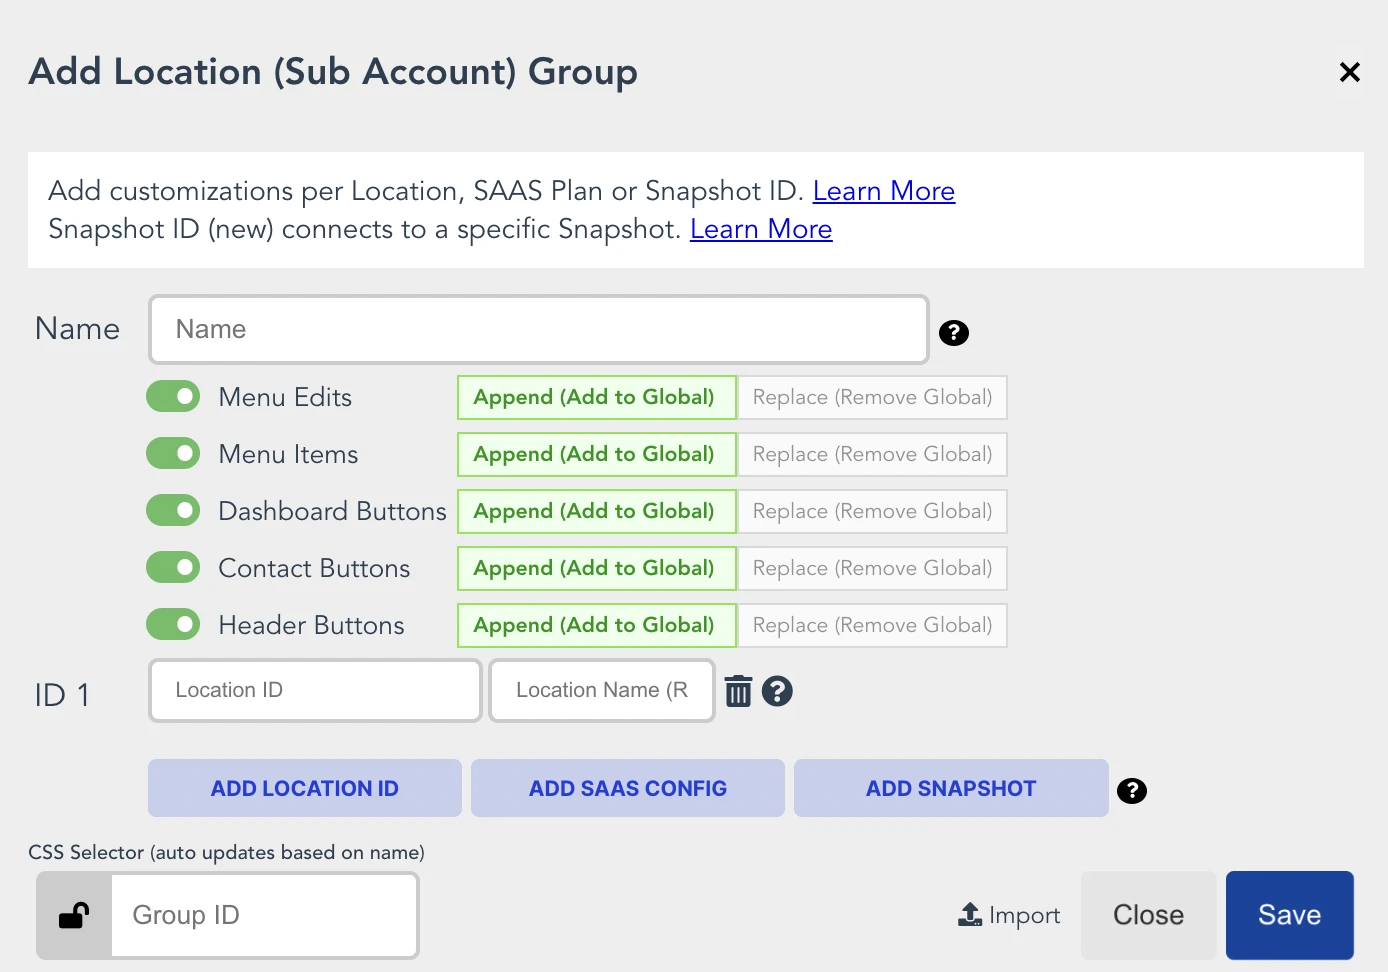
"Name": The name of the Location Group displayed in the GHL Customizer.
Toggle Switches: Sets the 'Append' (inherit Global) or 'Replace' (use Group's custom) behavior for features.
"ID 1": Default row for manually entering Location ID and Location Name.
The Blue Buttons: Used to choose different methods for adding sub-accounts (e.g., Location ID's, SaaS Config, Snapshot ID's, Google Sheet).
"Group ID" (advanced): A custom CSS Selector for targeting the group with custom CSS.
Import: Allows importing a configuration file to clone an existing Location Group's settings.
Methods for Adding Locations to a Group
You can link sub-accounts (Locations) to a Location Group using four primary methods:
1. Manual Location ID
Copy the Location ID from the URL of the location page.
Paste the ID directly into the location group configuration.
2. SaaS Configurator Plan ID / Price ID
Sub-accounts are automatically placed in the group based on their associated SaaS Plan.
Click the "Add SaaS Config" button.
Plan ID Method (Recommended):
Find the Plan ID by going to your SaaS Configurator, clicking "Edit Plan," and copying the ID from the URL address bar.
Enter the Plan ID in the left-side box.
Price ID Method (Legacy): Due to changes with HighLevel, if a Price ID does not start with "price_", you must use the Plan ID method above instead. See details here.
Enter the Price IDs for both monthly (left box) and annual plans (right box).
To add additional SAAS Plans (using Plan IDs or legacy Price IDs), add a new row by clicking the blue "Add SAAS Config" button. One Plan ID (or set of Price IDs) per row.
Click the blue "Save" button when you are done configuring your Location Group.
Now any new sub account attached to a SaaS Plan/Price IDs you've entered here will adopt any Location Group customizations you set up.
3. Snapshot ID
This method links a Location Group to a specific Snapshot ID.
Copy and add the Snapshot ID to the group configuration.
Conflict Priority: If a location is linked to multiple Location Groups (via multiple Snapshots), the group with the lowest Conflict Priority (1 being the lowest) takes precedence.
4. Google Sheet
This method uses a Google Sheet to manage assignments, often automated via Workflows.
Setup: Copy the template sheet, set sharing permissions to "Anyone with the link," create tabs with plan names (no special characters), and use the required "Location ID" and "Location Name" columns.
Connection: Copy the complete Google Sheet URL to the group settings and connect to the sheet and appropriate tab.
Automation: Use the "Agency Management Workflow Actions" to create workflows that trigger on events (e.g., "Order Form Created") to retrieve Location IDs and automatically add entries to your Google Sheet.
Custom Menu Features
The GHL Customizer offers several ways to customize the menu for a Location Group:
Smart List Menu Item Action: This new action allows you to add a special menu link that goes directly to a specific Smart List view. See details here.
Configuration: Open or create a Location Group Menu Item, click the "SMART LISTS" button, and configure the settings.
Custom Dividers: A checkbox feature allows you to insert your own custom dividers into the menu. See details here.
Linking to Unlisted Items: For menu items not available in the dropdown, you can copy/paste a native HighLevel page URL for a specific location. The Customizer will reformat it to work correctly for all locations in the group. See details here.
Other Features
Duplicating a Location: While direct duplication is not possible, you can Export a Location Group's settings and Import them into a new location. See details here.
Note: The "Export" option allows for exporting all of the Location Group's settings, or just its custom Menu.
Support
For assistance with location group configuration or workflow setup, contact support@themarketerstoolkit.com